Saturday, March 31, 2012

Spring Wreath

I FINALLY finished my Spring wreath. Ok, ok, it isn't really super "springy" but it's new, anf in time for Spring :)For this wreath, I followed pretty much the same process that I shared with you for the baby shower wreath in this post. This time I used a styrofoam wreath form because it was smoother (and I already had one) and instead of adding a chalkboard, I added more flowers.


 I really like the look of the styrofoam wreath better but I did have to pay more attention to the yarn as I was wrapping. Because this wreath was more flat than round, I had to be careful to overlap some to keep the styrofoam from showing.


Here is a closer view of the flowers that almost cost me an index finger. As I was gluing the center on the gray flower, I gave myself a huge third degree burn on the end of my finger....ok, not a third degree burn, but it hurts, seriously.  I am currently only using 9 fingers to type.(PS, don't google home remedies to ease a burn, none of them work)

I had to share this picture. This is Titan peeking through the blinds trying to figure out what in the world I am doing.


Thanks for stopping by! I would love to see links of your Spring wreaths!
.


Shared on Think Pink SundaysWeekend Wrap Up Party,

Thursday, March 29, 2012

Chevron Obsession

I love chevron prints. What's not to love about the crisp zigzags and fun colors?? I am trying to figure out where to incorporate a chevron pattern into my craft room make over without going overboard. Here are a few of my inspirations:
This BEAUTIFUL chair is a makeover from The House of Wood. I am still needing to recover the chair that I have with my awesome new desk from my last post so maybe a pretty turquoise chevron??
Or these AWESOME Ombre Chevron Curtians by r these AWESOME Ombre Chevron Curtians by By Nancy of Owen's Olivia (found on remodelaholic.com) I could totally do these in pink to go with my gray walls!

Even this pink chevron rug from Apartment Therapy


Ahhhhh sooo many options! What are your favorite ways to use chevron?

Monday, March 26, 2012

Desk Redo - Reveal

I am super excited about how my first ever furniture refinishing project turned out! I posted this picture last week of a desk I bought off of CraigsList. I bought the desk for $20 which was a STEAL considering most people in my area want your first born for their beat up furniture on CL.

One word of warning, my $20 desk quickly turned into a $50 desk. I know that still isn't a bad price, but I didn't realize how quickly it would add  up. We just moved into our house back in August so of course starting out we don't have some of the supplies that most people probably have lying around so I had to start from scratch.

  I originally set out to sand the whole thing with a sponge block sander. WRONG! 20 mins later I had an area about 4 inches by 4 inches done and had already gone through my sandpaper. I called the FIL for advice and he suggested I buy stripper. Back to Lowes I go....but it was totally worth it! I used a stripper in a spray can and it worked like a dream. (Yes, it is dark outside in this photo, at this point it was about 9:30pm, what can I say, I have no patience)

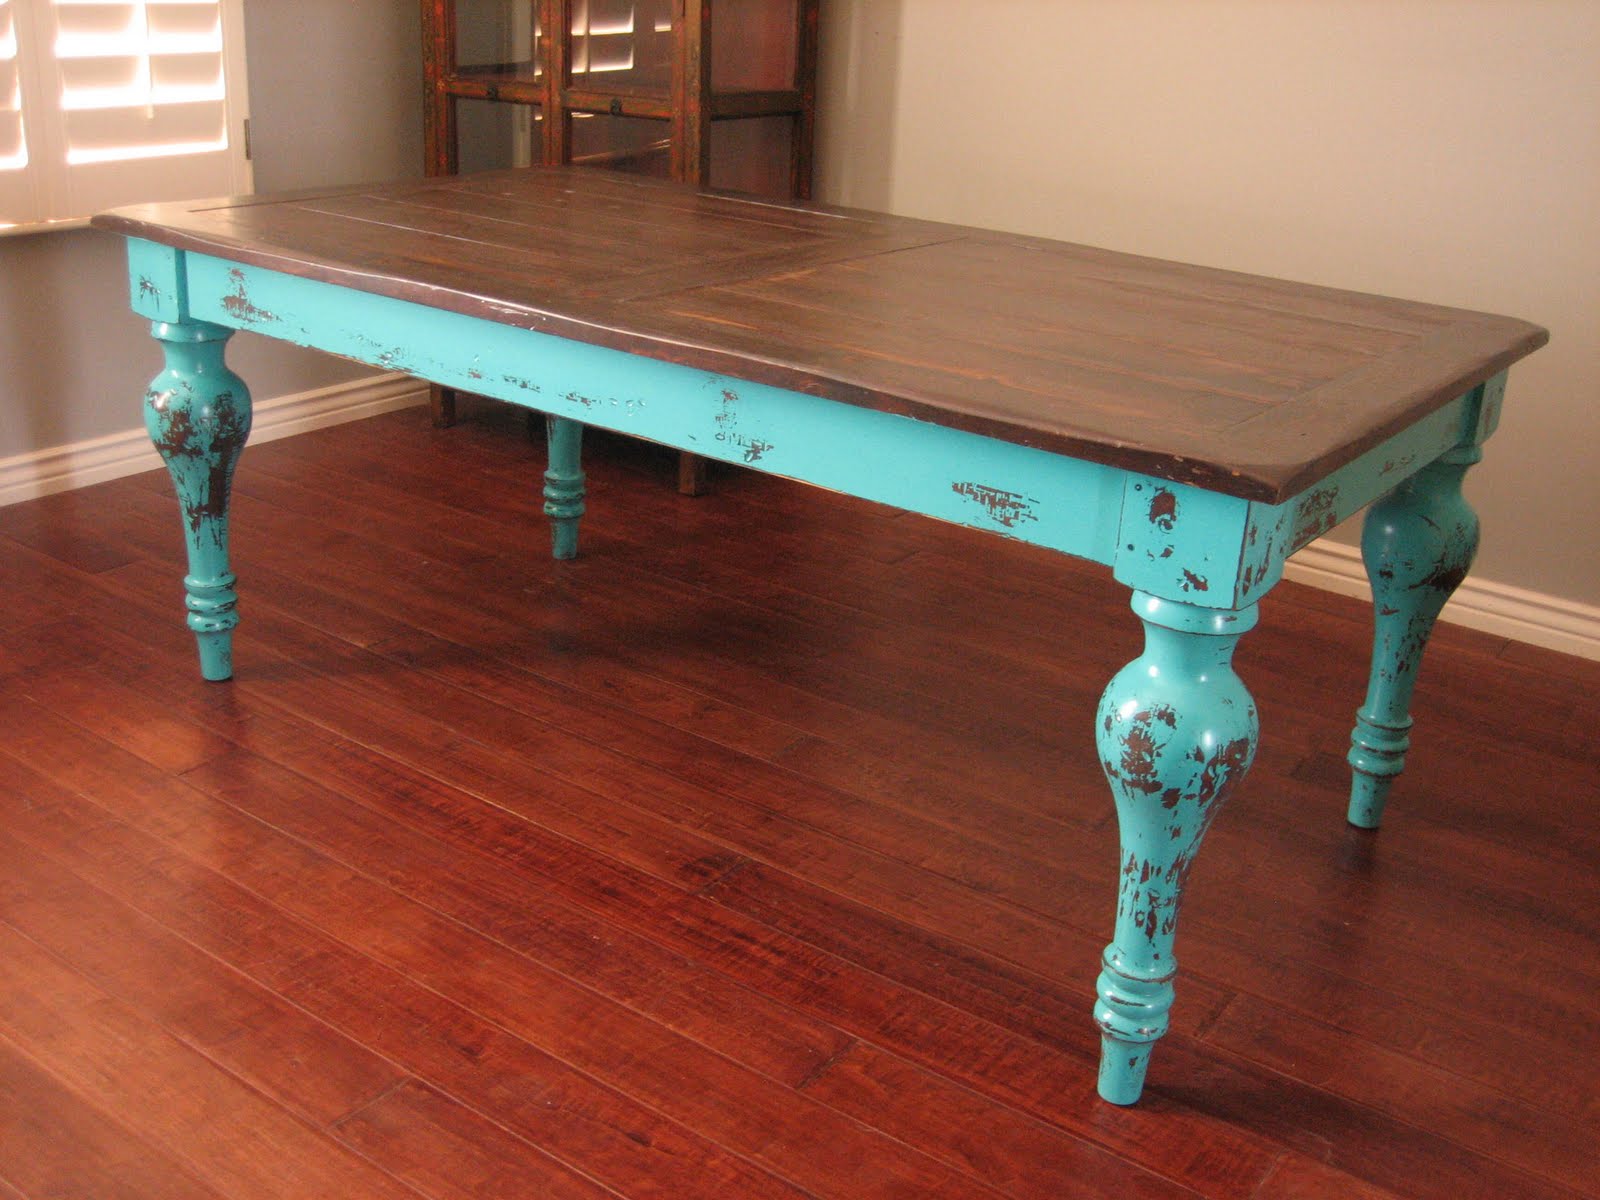
Next, I sprayed a gray primer over everything but the top of the desk. I really struggled on what to do first because I didn't want to get stain on the primer but I didn't want to get primer on the stain either. Finally I covered the top with a garbage bag and spray primed the rest of the desk. Then I used the smallest can of MinWax stain in Jacobean to stain the top. I left it on for the full 15 mins and then took it off with a soft cloth. I let it dry overnight.


 Then I put two coats of latex paint in Tantalizing Teal.  I bought a Valspar 8 oz. Paint Samplefor $3 and it was more than enough for two coats.
TADA!!!
I didn't change the hardware because it actually matched the top perfectly.

I am THRILLED with the results and I can't wait to use my beautiful desk. Not bad for a "first timer" if you ask me!


I also painted the walls in the craft room gray this weekend. I can't wait to get it all put together and then share pics with you all.

** I was in no way paid for mentioning the products in this blog, I just loved them so I thought I'd pass them along**

Linked up with Making The World Cuter (as my entry into their give-away)


Friday, March 23, 2012

Desk Revamp

For a while now, I have been wanting to get into furniture refinishing. I 100% blame pintrest and linky parties for this new adventure. I keep reading and seeing pictures of how you ladies find furniture for $5 and turn it into a million bucks. I have been scouring CraigsList, yard sales, and thrift stores for months but can never seem to find deals like those. FINALLY last week I stumbled upon this desk on CraigsList for $20. Yay!


It took me almost a week to get it, first because on my way to pick it up it came a monsoon, then because when I got there the lady had locked herself out of the house, then she lost her phone.... Anyway, Tuesday, I finally was able to switch cars with my husband and go pick it up.

This will be my first furniture redo so I am a little nervous. I am the type that when I decide I am going to do something I research and research and research some more. I have read countless blogs on how to refinish furniture and I now believe I am a professional. :)

Here are a few of my inspiration pieces...
 I really love the colors on this table. I bought turquoise and a dark stain to recreate this effect.

Don't you just LOVE the distressing?? Actually, my DH hates it. He thinks it looks "imperfect" but I think that's the beauty! :) 


I have a three day weekend this weekend so I'm hoping to finish it up and post it for all of you to see! Wish me luck! If you have an advice or suggestions I would love to hear from you!

Wednesday, March 21, 2012

Pink and Green Baby Shower

Remember the wreath I blogged about over the weekend? 
Well yesterday was the big baby shower! This was my first time to ever throw a baby shower and I think it went quite well. A co-worker and friend of mine, Mallory, and I worked super hard to make this shower cute. I am very proud of our final result. 

Here is a picture of the food table. Mallory made those gorgeous hanging poms from tissue paper. There are TONS of tutorials out there in blogs and on pintrest. She mixed a few to come up with these. Her suggestion?
- Make two poms of 10 sheets and join them in the middle to make them look fuller. 
As for food, we served Pigs in a Blanket and Sausage Balls (Mommy-to-be's request, thanks for making them Jenny!) A veggie tray, this AWESOME fruit salsa and cinnamon chips, adorable cupcakes from Mallory, brownies, and peanut butter-kiss cookies. 

I made this pink lemonade punch and it received great reviews! I doubled the recipe and we still ran out!


 The picture on the right and the wreath were gifts from me. For the picture, I framed some pretty paper and used my cricut to put her name directly on the glass. I have added the picture to my etsy shop if you are interested!

I have also added the "Wishes for Baby" cards we passed out to the guests. Each guest took one and filled in the blanks. It was neat to go back and read each of them with Britney after the shower. I have added these to my etsy shop also and can customize with different colors and of course your baby's name.


Finally, here is a picture of the mommy-to-be and guest of honor, Britney. Doesn't she look great! Carson is due in just two weeks! We can't wait for her arrival so we can all love on her.


Linking up at:
Blue Cricket Design

Friday, March 16, 2012

Baby Shower Announcment Wreath

So my friend and co-worker Britney is having a baby girl in a few short weeks. We are throwing her a baby shower at work next week and I've been a busy bee making a few decorations for the shower. This is my first time to throw a baby shower so I am super psyched. Check out this super cute yarn wreath I made for her. The idea is that we can use it to decorate for the shower and then she can keep it and hang it on the hospital door once the baby arrives!
It took a little longer than I thought, but it was super easy. First, I wrapped a wreath form in yarn, overlapping in sports where it needed it. Just keep wrapping and wrapping. This is where I should warn you that your arm may feel like it is going to fall off, but keep on wrapping.
Next, I used my trusty Cricut to cut out a banner with her name. The paper matches her bedding. I used the Accent Essentials cartridge for the background and StoryBook font.
Then, I made a few felt flowers from this EXCELLENT tutorial from EmilySoutherland.com.She used a t-shirt material for hers, but I used felt.
Finally, I painted a wooden piece I picked up at Michael's for 75 cents. I painted it white, and then painted the front with chalkboard paint so that Britney can change the message as she wishes!
I'm super excited at how this turned out. Next time I will be a little more careful in choosing my wreath form because this one looks a little lumpy, but other than that I can't wait to give it to her at her shower!
I'm considering putting these in my etsy shop. What do you think??


Linking up to: Weekend Bloggy ReadingTickled Pink at 504 Main

Sunday, March 11, 2012

Claddagh Plate- Wedding Gift

Meet Marly.
Marly is one of my friends from high school. We go waaaaay back. She's great! She will be marrying her fiance' Chad in April. I wanted to make something special for her and Chad for their new life together. Since Marly is probably one of my biggest supporters of my Etsy Shop, Over The Moon Gifts I thought it was only fitting that I make something for her. She and her fiance' are incorporating their Irish heritage into their wedding so I knew a claddagh would be perfect!
The plan was simple- Since this plate is for decorative purposes only, I used a plain ole' sharpie paint pen to draw the polka dots. Then, I used my cricut and SCAL to cut the image and lettering. Using transfer paper, I transfered it all onto the plate and then gave it a few good coats of clear spray paint to seal the deal. I'm really happy with the way it turned out! "The Claddagh's distinctive design features two hands clasping a heart, and usually surmounted by a crown. The elements of this symbol are often said to correspond to the qualities of love (the heart), friendship (the hands), and loyalty (the crown). A "Fenian" Claddagh ring, without a crown, was later designed in Dublin. Claddagh rings, with or without the crown (most commonly with a crown), have come to denote pride in Irish heritage, while continuing to be symbols of love or marriage." - (Wikipedia)
I have added these to my etsy shop so if you know someone else who would like one, please send them my way!


Are you using any cultural references in your wedding? I would love to hear about it! I'm linking up with:

The Girl Creative
I Heart Nap Time
MakingSkip To My Lou

Today's Creative Blog

Saturday, March 3, 2012

Mustache Craze - Coffee Mugs

Hey everyone! Hope you are having a great weekend! I just wanted to do a quick post to share my newest item with you all. His and Her Mustache and Lips Coffee Mugs
What do you think??

Shared on Photobucket
Sumo's Sweet Stuff
The Girl Creative Featured on Kater's Acres Blog!