Thursday, December 27, 2012

New Laminate Flooring

Good morning! I hope you all had a great Christmas. We have been super busy around here. We decided to spend the break putting in new floors in our home. It has turned out to be a bigger project than I had thought.

Before
We had the standard builder beige carpet all through out our house. It was build in 2001 and hadn't been changed since. With two dogs in the house, it was a nightmare!

After much deliberation and research, we decided to install laminate flooring instead of hardwood. Laminate holds up to scratching better and with our two dogs, that's pretty important to us. Also, this is our first house, not our forever house so I couldn't see us investing in nice real hardwoods in our starter house just for them to get all scratched up.

We went with a 10mm laminate. If you choose to use laminate, I would suggest getting a 10 or 12mm because of the increased durability. There are some great options out there that really look like real wood. Ours had the pad attached. We got a 10mm Spring Mountain Oak from Lumber Liquidators for about $1.80 per sq. ft. Do some price shopping before you start, but we found LL to have
the best prices in our area.

 I was surprised at how easy it was to pull up our carpet. Once I found a place to start, it was only attached along the wall and I could just pull it up with no trouble. I would suggest wearing a dust mask. I couldn't believe the filth we had been living in!! GROSS!


Installing the laminate wasn't extremely hard, just time consuming. Once we got into a rhythm, it became easier. One of the hardest parts is deciding how you want to lay your pattern and making sure all those measurements work out. Our pattern alternates starting with a full board, 2/3 board, 1/3 board, repeat.


Here is the finish product. It really makes the room look bigger. While it does show dirt, at least it is easier to clean than the carpet. I love the color too, it really makes the yellow walls pop. I will post a better picture when it is 100% compete!  I am currently in the process of replacing the living room floor so I'll do another post when it's finished!
 
Thanks for stopping by!


Sunday, December 23, 2012

Merry Christmas!

Merry Christmas from Amanda, David, Allie, and Titan!


Monday, December 17, 2012

Christmas Table Setting 2012

Finally getting around to posting this year's Christmas Table setting.

This year I used silver chargers, my grandmother's china dinner plates, and some super cute Christmas tree salad plates that I picked up at TJ Maxx for about $3/plate.

Christmas place setting

Sunday, December 16, 2012

"Suffer not the little children..." Response to the Sandy Hooks shooting


14 Jesus said, “Let the little children come to me, and do not hinder them, for the kingdom of heaven belongs to such as these.”
- Matthew 19:14 (NIV)


The tragedy in CT this weekend has no doubt had an effect on us all in one form or the other. My heart goes out to the families who have lost loved ones. When tragedy involves the lives of children, it is always heart-wrenching. As the news story began to unfold on Friday, as a nation, we were all watching. This was one of the biggest tragedies of my generation's time. I could spend this blog post going into my theories on why I feel my generation behaves the way they do, or I could talk about my stance on gun control, but today, I will do neither. Today I want to talk about something far more important, the grace of God. I know that by writing about religious matters, I will likely lose some of my readership, that's okay. Your eternity is more important to me than the $0.33 I made off of my advertisements last month.

I am not a "doomsday-prepper" or a believer in the Mayan doomsday next week, but I do believe the end is near. As I look around me at the news stories that are only getting worse each day, I can't help but wonder how long God will allow this to continue. It is for this reason that I write today.

I believe that the children that were lost in Friday's shooting are in a better place. I know that it doesn't make it easier, but it does provide some level of comfort. I do not have children, and honestly, events such as this makes me a little hesitant to start a family, but I do believe there is a greater purpose and in ALL things, God is sovereign.

I work for a university that suffered a shooting on February 12, 2010. That day, my life changed forever. In our case, the shooter was a faculty member and she opened fire in a staff meeting. I remember it was a very cold Friday morning and we were preparing for an event for incoming students. It was snowing, it never snows in Alabama. I remember the feeling of betrayal even though I did not have a personal relationship with the shooter. It was a betrayal of my "safe zone." Before that day, news stories about shootings didn't resonate with me the way they do now. I always thought "it can't happen here, it's not like that in my town, at my school, at my workplace." Still, almost three years later, my heart skips a beat when I hear a siren on campus.

It can happen anywhere and unfortunately, it will happen again. It will happen again because we live in a sin ridden world, but don't give up hope. There is good news.

"For God so loved the world, that He gave His only begotten son, that whosoever believes in Him, shall not perish but have everlasting life."
John 3:16
 
This world is not the end, it is only the beginning. If you do not know the God that I speak of, the God that gives hope to a fallen world, I encourage you to check out this link to read about this God that loves you, that sent His son to die for you, and gives eternal hope.

"The Lord is not slow in keeping his promise, as some understand slowness. Instead he is patient with you, not wanting anyone to perish, but everyone to come to repentance."
2 Peter 3:8-9

In Christ,


Monday, December 10, 2012

Christmas Wreath Party

Good morning! I hope you all had an excellent weekend. Last week was super busy for me so I didn't get to post much. I spent a few days in beautiful Cincinnati, Ohio. I just love Cincinnati. It is a pretty city with a real charm. When I worked in Admissions, I spent a good bit of time there so I was excited to go back for a few days. It was especially nice to get to see it all decorated for Christmas.


While it was a great trip, I was definitely glad to head back home on Friday. I think I brought the rain with me though because it is a dreary day here in Alabama. Yesterday, I held a small Pinterest party and made a new wreath for our front door.

Wreath Party


Wreath Party

This is Jennifer's wreath hung up and looking all festive. I just love how different they all turned out. Hers is a live wreath so it smells WONDERFUL!
Natural Wreath

And here is my wreath adorning our front door.
Christmas Wreath
I LOVE it! It is my favorite wreath so far. I made it using this tutorial from Kristen's Creations Online as an inspiration.

I want to make this a Christmas tradition but next year I will have the party a little earlier so that I can enjoy my creation longer!

Have a great week!

Monday, December 3, 2012

JOY Wall Hanging

This was one of my favorite DIY Christmas projects this season. Mainly because it took all of about 5 minutes and cost about $6. Quick and cheap, can't beat that.
 
Since our Christmas tree is in the corner of our living room, it leaves a section of our wall between the windows feeling a little off balance. I knew I needed to hang something vertical here but wasn't sure what. I spent my whole lunch hour walking around Hobby Lobby looking for some inspiration and finally settled on these wooden letters to spell out the word 'Joy". The letters were about $2.50 each and they are about 8 inches tall.
 
I took some left over red spray paint from a project that was an epic fail and gave them a good coat.
 
DIY Christmas Wall Hanging
 
Then I took those nifty command picture hangers (the ones with out the hooks) and stuck them to the wall. These were great  because I didn't have to add three more nail holes to my wall.
DIY Christmas Wall Hanging
 
Ta da! This does a really great job tying the room together. For 5 mins and under $10, this is definitely my kind of project.
DIY Christmas Wall Hanging
 
Thanks for stopping by!
 
~Amanda
 

Saturday, December 1, 2012

Outdoor Christmas Decor

Today was a great day. We finally out our outdoor Christmas decor up, hubby was off work and home with me all day, and my alma mater won it's 23 SEC Championship, securing it's spot in the second straight National Championship. Roll Tide!
 
 
Here are some pics of our outdoor decor. This is our first year to decorate outside. Next year, I will definitely not skimp on the garland and invest in the thicker stuff. That's what I get for being cheap thrifty. I would also like to add those adorable little mini Christmas trees where the poinsettias are sitting. Maybe I can pick up some at an after-christmas sale.
 
Here is what it looks like in the daylight.


And at night!

Monday, November 26, 2012

Festive Corn Casserole

Good afternoon! I hope you all had a great Thanksgiving. It was a beautiful day in Alabama, I hope your weather was as great as ours.

I tried a few new recipes this year that I would love to share with you. The first is a festive corn casserole that I actually made for the first time for Thanksgiving last year. I got this one from my former boss who brought it for an office pot luck. You see, I don't eat many (ok, any) veggies so the fact that I LOVED this corn casserole is a miracle and definitely worth posting.

The origional recipe is from Cooking Light so it isn't even bad for you! The origional artical can be found on MyRecipe.com but I have also included it here with my edits (in red).

Corn Fritter Casserole, Photo: Randy Mayor, Melanie J. Clarke


Ingredients

  • 3 tablespoons butter, softened
  • 3 large egg whites
  • 1 (8-ounce) block fat-free cream cheese, softened
  • 1/2 cup finely chopped onion (I put mine in the food processor)
  • 1/2 cup finely chopped red bell pepper (again in the food processor)
  • 1 (15 1/4-ounce) can whole-kernel corn, drained 
  • 1 (14 3/4-ounce) can cream-style corn 
  • 1 (8 1/2-ounce) package corn muffin mix (such as Jiffy)
  • 1/4 teaspoon black pepper
  • 1/2 cup Cheddar Cheese (shredded)
  • Cooking spray

Preparation

  1. Preheat oven to 375°.
  2. Combine first 3 (and shredded cheese) ingredients in a large bowl, stirring with a whisk until smooth. Stir in onion, bell pepper, whole-kernel corn, and cream-style corn; mix well. Add muffin mix and black pepper, stirring until well combined. Pour into an 11 x 7-inch baking dish coated with cooking spray. Bake at 375° for 50 minutes or until a wooden pick inserted in center comes out clean.
Billy Strynkowski,  
SEPTEMBER 2004


Monday, November 19, 2012

Christmas Decor Inspiration

It's almost that time of year again. Time to pull out the Christmas deocrations and finally get to some of the pintrest projects I've been waiting a year to try.

I am an advid follower of the rule that Christmas decorations are not to be put up before Thanksgiving. One holiday at a time people!

Eventhough I refuse to switch over to the dark side, I have started planning what projects I want to take on this year to add to my Christmas decor.
Here are a few Pintrest Projects that I hope to tackle this Christmas:


Thursday, November 15, 2012

Pandora Stackable Rings - New Bling

I'm super excited to share with you the pandora ring I got to add to my collection.

Disclaimer - I am NOT a style writer. I am doing good to match each day. If you came here looking for a style blog you are going to be very disappointed. (you may want to check out my friend Megan's style blog though)

I already had the silver twist and I immediately fell in love with the Black Rutilite ring. Since the silver twist has a little bit of patina/antiqueing/?? in it so I thought it needed another band that would pull the look together. I just love stackables because they are so versitale.

Pandora Rings
 
Here's what they look like on.
Pandora Rings

If you love them as much as I do, here's where you can find them:


Tuesday, November 13, 2012

DIY Rustic Wooden Sign

In case you missed it in my previous post, my dear friend Nikki got married this weekend. I wanted to make something special for her new home as she begins a new life with a new last name.

I had been admiring the vintage wooden signs that you see everywhere online. Here's a little secret about me.... I'm just crazy enough to believe I can do anything I set my mind to, so I decided to make one myself. It was actually super easy. Here's how I did it: (Warning: This post is very picture heavy, stay with me :)  )


First I cut a 1"x 6" board to my desired length. For this one, I made it just a little shorter than the width of a door or window frame.

I used white wood from Lowes. It's pretty inexpensive and easy to work with. If you can get your hands on some old barn wood that would look better. There aren't a lot of old barns in Rocket City - Huntsville, AL, I'll have to go digging around in my hometown of Holly Pond for that.


Next, I put a coat of stain on the wood
so that it wouldn't look so "new" when I distressed it.


 Then I gave it a light coating of spray paint. I let it dry and then used my mouse sander to rough up the paint job a little. I paid special attention to the ends and the edges. I wanted to see some of the wood through the paint.


 Lettering. This was the hardest part. I have terrible handwriting. I blame it on being left handed. I picked a nice block font and printed off her name in a large font and then lined it up on my board. I used a pen to trace the outline of the letter onto the board. Be sure to press down pretty hard so the pen will leave an indention on the wood underneath.


Next I took a sharpie paint pen and went over the outlines. Be sure to use a paint pen and not a regular sharpie. A regular sharpie will have that weird purple metallic look from the side. It also doesn't sand as well.


Once I had my outlines traced, I filled in the letters with a small paintbrush and some acrylic craft paint.


After it has completely dried, I took my mouse sander and LIGHTLY sanded over the lettering. It is very important that you make sure the paint is completely dry, if not, you will smear the whole thing and have to start over. (not that I know from experience *cough*)


Finally, I added two picture hanging brackets on the back. Be sure you measure so that they are equally spaced from the ends. (Unless you want to play a joke on the person you are giving it to, it would  make it ridiculously hard to hang straight)


DIY Rustic Wood Sign

TA DA!  Here is the finished product. I didn't hang it on my wall for a photo because I would have had to make two holes in the wall, but you get the idea.


If you decide to make your own, be sure to link up with me! I'd love to see it!

Thanks for stopping by!!

~Amanda

Sunday, November 11, 2012

Sips and Strokes with Some Pretty Cool Folks

Ok, ok, I know today's title is pretty cheesy. I really couldn't resist. This week has been super crazy. I wanted to post earlier this week but couldn't find time to sit in front of the computer long enough to type out a blog.

My friend Nikki is one of my favorite people. We go way back. She's one of those friends that knows way too much about you but loves you just the same. :) Here is a pic of us at my wedding last year.

 
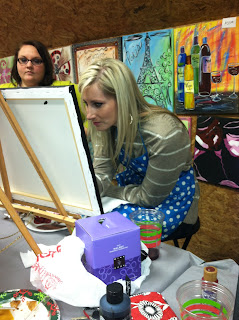
This week I was able to make it down to Cullman for her bachlorette party. We did a painting class at the Candle Garden, which is like Sips and Strokes. It was so much fun! In addition to celebrating all the wonderful things going on in Nikki's life, it was also really great to see my old roommates, Sara and Amy.
 
 
Here's what we painted!
Roll Tide!!
 

Amy working hard on her painting.
Nikki and her sister, Allison
 The whole group.

 Can you tell we had a great time?? It's pretty cool how all the paintings turned out to be different.
At some point this week I will post the present I gave Nikki with a tutorial.
 
Have a great week!
 
~Amanda